Easton Place

Grain-Free Banana Peanut Butter Muffins

easton_place

Happy New Year, friends! I trust you had a lovely holiday. I, for one, enjoyed the break from routine and just doing nothing, really. Well, I hung out with my family and saw friends. I attended & hosted a party or two. Generally speaking, though, I relaxed! With temperatures around zero or single digits, I'm having a bit of trouble getting into gear! Here it is January 8th and I've only now returned to work. It's all good though. My January calendar is fairly full. I'm about to start working with a new client on her brand new business logo (my favorite!), I've got new customizable, pre-made logos about to launch and I continue to prepare yummy, whole food, for my crew at home. This brings me to today's topic: Muffins!

As you may know, if you're a regular visitor to my journal, I am a grain-free observer. I will have corn now and again (organic only), but all the other grains don't agree with me. So I'm getting creative in the kitchen when it comes to baked goods. Here's my latest recipe based on several flourless muffin recipes, but with my own twist. For example, I love adding extra eggs, vanilla and hazelnut meal whenever possible. This recipe is no acceptation.

grain free peanut butter banana muffin ingredients

Ingredients:

  • 1 large ripe banana
  • 2 large eggs
  • 1/2 cup creamy organic peanut butter (I prefer using regular organic peanut butter when baking rather than homemade peanut butter. The homemade type tends to be too runny for baking in my opinion.)
  • 3 tablespoons organic maple syrup
  • 1 tablespoon madagascar vanilla (please use the real stuff)
  • 1/2 teaspoon baking soda
  • 1/4 teaspoon sea salt
  • 1/3 cup fine ground hazelnut meal/flour
  • 1/4 cup mini semi-sweet chocolate chips

Directions:

grain free muffin batter
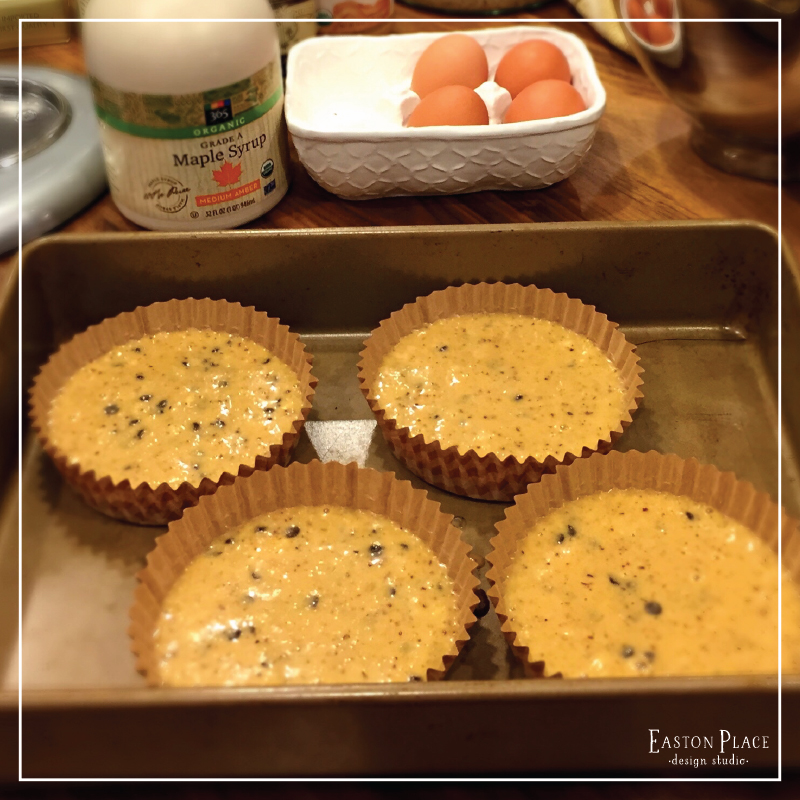
  • Preheat oven to 400˚F.
  • Using your stand mixer or hand mixer, combine all ingredients but the chocolate chips, and mix/whisk on medium low speed. Add the peanut butter once  you've added all the other ingredients to insure it doesn't clump and stick to the bottom of your bowl.
  • When you've got your batter well combined, fold in your mini chocolate chips until incorporated.
  • Pour into your muffin papers. I like using the larger variety, which makes muffin-tops.
  • Bake for 17 minutes if you're using the larger papers. Your baking time will vary based on the size of muffin papers you use.
  • Enjoy warm, fresh from the oven with a bit of butter on top. You can also keep them in an airtight container for 4-5 days, but honestly... who can keep from eating muffins that long?
Grain Free Peanut Butter Banana Muffins

I'm guessing you have all the ingredients in your kitchen right now, though maybe not the hazelnut meal/flour. If you don't have the hazelnut meal... go get some! It's a delicious addition to your baking. Especially if you're embracing the grain-free or gluten free lifestyle! Give this recipe a try. And if you do, please let me know, in the comments, how you like them!

Cheers!

-Patti

What a Month!

easton_place

Well hello there! It's been a month since I posted in my journal. Whew! Things have been busy in this little studio. I hope everyone has been enjoying their holiday season. I'm starting to wind down, preparing to give myself a little break from designing. My boys will be off from school, and my husband will be taking a break from his work as well. I'm really looking forward to some down time, sleeping in a bit, lingering cups of tea in the morning and afternoon, and general relaxation. I know a lot of people like to travel during the end of year holiday season, but I much prefer to stay in, build a fire and just enjoy my home and family. Before I close up this little design shop for 2014, I thought I'd share a few designs I've worked on over the past couple of weeks.

The first is actually a design I did a while ago. One of my favorite design clients, India Rose, had me design a logo for a new party business that's getting started! I designed the logo for India's wedding business, and now I've designed the branding for her latest venture: Lavish MV. It's such a fun logo, don't you agree? I can't wait to read all about the festivities India pulls together!

So far the Lavish MV branding package includes the logo, design elements, letterhead, and a custom address stamp.

So far the Lavish MV branding package includes the logo, design elements, letterhead, and a custom address stamp.

The original pre made logo package looked like this.

The original pre made logo package looked like this.

The next item up on the list is a branding set I did for The Simple Taste Kitchen. The hostess of The Simple Taste Kitchen, Bianca, takes amazing photos of the foods she prepares. You can check out her Instagram feed to see for yourself. Bianca contacted me to design a logo for her based on the pre made logo "Salted Butter". If you follow me on Facebook, you might recall a posting about it.

What you may or may not know, is that pre made logos can be purchased as an exclusive if no one has previously purchased it. Luckily, Bianca grabbed it up before anyone else could, and I customized it to fit her needs. I also designed custom social networking buttons and Facebook headers and profile options for her. I'll be introducing brand new pre made logos in January. They can be customized with your business name and colors, or if you're quick enough, they can be purchased as an exclusive! Keep your eye open for the new line up mid January.

The finished branding board for The Simple Taste Kitchen

The finished branding board for The Simple Taste Kitchen

I've also designed custom stationery, business cards and a blog collaboration logo for Liz over on The Lemon Bowl! The collaboration logo I can't show you just yet, but I am really happy with how it turned out and am looking forward to sharing it with you soon! Until then, I can show you the custom cards I designed for Liz!

Stationery with printed envelopes, and double-sided business cards for The Lemon Bowl!

Stationery with printed envelopes, and double-sided business cards for The Lemon Bowl!

One last project I completed was a more personal project. I designed the wine tags, seating place cards and gift table for my husband's annual end-of-year work party! I really was hoping to make a quick diy video for the seating cards, but I just couldn't find enough time in the day! The evening was a festive one filled with good friends, delicious food and lots of cheer. I look forward to this party all year long. My husband's assistant always designs beautiful centerpieces for each table, and then the two of us have fun decorating the place. 

That's going to do it for today's recap of the past couple of weeks! It's been a full and rewarding holiday season so far. I hope you and your loved ones are filled with the joy of the season. Wishing you a very happy holiday and sweet New Year!

xoxo, -Patti

Latest Custom Designs: November 17, 2014

easton_place

It's been quite busy here in the studio. This is, of course, a very good thing. I love custom designs. It's fun to listen to a client's ideas and then create something uniquely theirs! The range of projects was quite varied. They included a business card for a teenager, an anniversary logo and a romance novel book cover. Variety is the spice of life, and it makes my work fun and never boring! So with that, here are a few of this past weeks custom designs.

(Number 1 was the chosen design. Personal info has been changed for privacy.)

(Number 1 was the chosen design. Personal info has been changed for privacy.)

(Number 3 was the chosen design.)

(Number 3 was the chosen design.)

Baked Apples with Fresh Whipped Cream

easton_place
baked apples with whipped cream
cheesy scrambled eggs and home fries.jpg

Today was a beautiful Autumn day in New England. It is Sunday night as I am writing this, but I spent much of my day in the kitchen baking and cooking. There's something about blue skies, chilly temperatures and strong winds that make me want to nest! I started the day making my favorite breakfast of cheesy scrambled eggs, crisp bacon and homemade potatoes (aka home-fries). I use to love going out for breakfast on the weekend, but now that our kitchen remodel has been completed, I can't seem to find a breakfast better than the one made at home. 

After breakfast was finished, I baked the rest of the grain-free chocolate chip cookie dough I'd made on Friday. So at this point my kitchen smelled like bacon, onion & potatoes and warm chocolate chip cookies. Mmmmm.... works for me!

My husband and older son went for a bike ride, and they always stop at the local apple barn for the week's supply of apples. I'd realized that there were still a few Granny Smith apples left from last week, so I decided to bake them up for an after dinner treat. As you might already know from reading my journal, I'm grain-free, so apple pies aren't really part of the menu just yet. I'm working on figuring out how to make a grain-free crust. Until then, this is an easy and delicious apple treat.

grain-free baked apples

Preheat your oven to 400°F and prepare your baking dish with a piece of parchment paper.

Ingredients

  • 5 Granny Smith apples (or your favorite tart variety)
  • 2 Tbs. Salted Irish Butter (room temperature)
  • 1/4 C. Dark Brown Sugar
  • 2 Tbs. Hazelnut Meal/Flour
  • 1 Tsp. Ground Cinnamon plus a bit for dusting
  • 1/2 Tsp. Ground Nutmeg
  • 1/4 C. Pure Maple Syrup
  • The Juice from 1/2 Small Lemon (about 2 Tbs.)

Directions:

Wash your apples and pat dry. Slice apples across the middle (so you can see the "seed stars" inside). Using a teaspoon, scoop out the center core and seeds. Place the apples on your parchment paper, cut side up. In a glass bowl blend the butter and all dry ingredients. Sprinkle the apples with the fresh lemon juice. Next fill each of the apple "wells" with the butter and spice mixture and drizzle with maple syrup. Dust with additional cinnamon and bake, uncovered for 7 minutes or until the apple meat is starting to pull away from the skin. Remove from oven and serve warm with vanilla ice cream, or let cool a bit and serve with fresh, homemade whipped cream sprinkled with cinnamon. Enjoy!